3.2 Interactive, Command Line and Batch Modes
Active@ KillDisk can be used two ways:
- Interactive Mode
- Command Line and Batch Mode
Interactive Mode
The steps for erasing data and wiping data are similar. Follow Steps 1 through 10 and then click the link to complete either the erasing process or the wiping process.
If you are booting from a CD/DVD-ROM drive, check that the drive has boot priority in the BIOS settings of your computer.
Here are the steps for interactive operation:
- Start Active@ KillDisk either from a bootable CD/DVD, a USB device, or the Programs menu.
The Local System Devices screen appears.
Figure Detected Physical Devices:
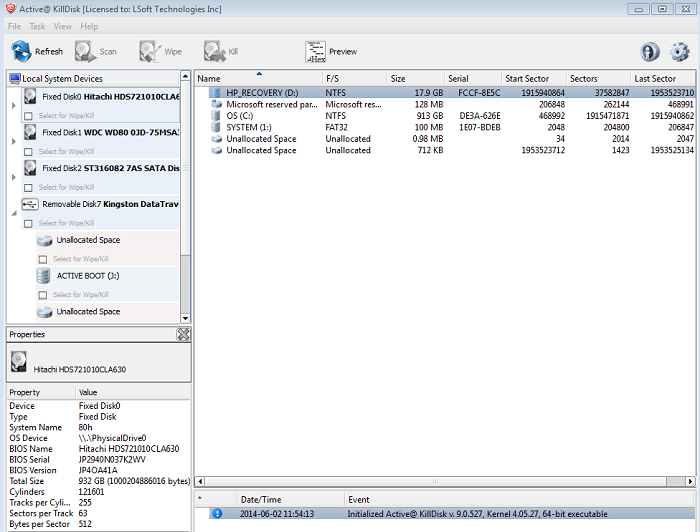
All system physical devices and logical partitions are displayed in a list.
Hard drive devices are numbered by the system BIOS.
A system with a single hard drive shows as number 0. Subsequent hard drive devices are numbered consecutively. For example the second device will be shown as Fixed Disk1.
- Select a device and read the detailed information about the device on the Properties pane. Below the device, select a logical partition. The information in the right pane changes.
- Be certain that the drive you are selecting is the one that you want to erase or wipe. If you choose to erase, all data will be permanently erased with no chance for recovery.
To preview the sectors on a physical disk or on a volume (logical disk), select it and press ALT + P, or click Hex Preview on the toolbar. The Hex Preview panel appears.
Figure Data Viewer :
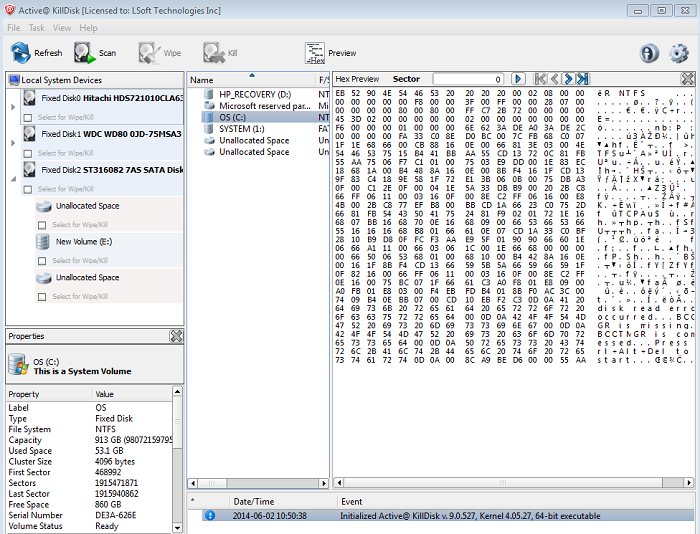
- To scroll up and down, use the keyboard navigation arrow keys PAGE UP, PAGE DOWN, HOME and END, or use the related buttons on the toolbar.
- To jump to a specific sector, type the sector number in the Sector box and press ENTER or click Go on the toolbar.
- When you are satisfied with the identification of the device, close the Hex Preview panel (ALT+P).
- To preview the files in a logical disk, select the volume and press ENTER or double-click it. KillDisk scans the directories for the partition. The Folders and Files screen appears.
Figure Files Preview
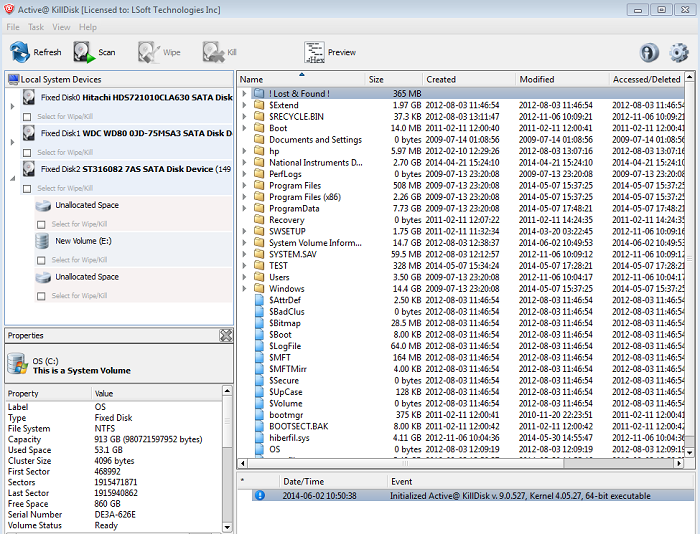
- Press TAB to move between panels or choose a panel with the mouse.
- To select an item in the list, use PAGE DOWN, PAGE UP or the up or down arrow keys or use the mouse.
- To open a folder, double-click the folder or select it and press ENTER. KillDisk scans the system records for this folder. The files in the folder appear in the right panel. Existing files and folders are marked by yellow icons and deleted files and folders are marked by gray icons. If you are wiping data from unoccupied areas, the gray-colored file names are removed after the wiping process completes. You may use the Hex Preview mode to inspect the work done by the wiping process. After wiping, the data in these areas and the places these files hold in the root records or other system records are gone.
- To detect disk hidden areas (HPA and DCO), select a physical disk in the Local System Devices list, then click Detect Hidden Areas from the context menu, or from Task menu. If disk hidden areas being detected, you can inspect them in Properties view:
- To reset Disk Hidden Areas (this feature is available in commercial versions only), select a physical disk in the Local System Devices list, then click Reset Hidden Areas… from the context menu, or from Task menu. After reset, PC reboot is needed for any software to access these areas properly. After reboot, the number of Visible Disk Sectors will be increased by number of HPA/DCO disk hidden sectors and these areas now ready for erasing by KillDisk.
- To map a network share, click Map Network Share… from the File menu, type connection parameters: drive letter (or mount point on Linux), network share full path, user account and password for the account, and click a Connect button. If all parameters are correct, network share should be mapped and available in Save As dialogs. All typed parameters stored to KILLDISK.INI file, and network share mapping will be restored when you launch KillDisk the next time.
Erase Data from a Device
When you select a physical device (for example, Fixed Disk0), the erase command processes partitions no matter what condition they are in. Everything is destroyed.
If you want to erase data on selected logical drives, follow the steps in Erase or Wipe Logical Drives (Partitions).
To erase the data:
- Be certain that the drive you are pointing to is the one that you want to erase. All data will be permanently erased with no chance for recovery.
- When you have selected the device to erase, select the checkbox for this hard drive. You may select more than one physical disk for the erase action. In this case these disks will be erased simultaneously. To permanently erase all data on the selected disk(s), press F10 or click Kill on the toolbar. The Kill dialog box appears.
Figure Kill dialog box
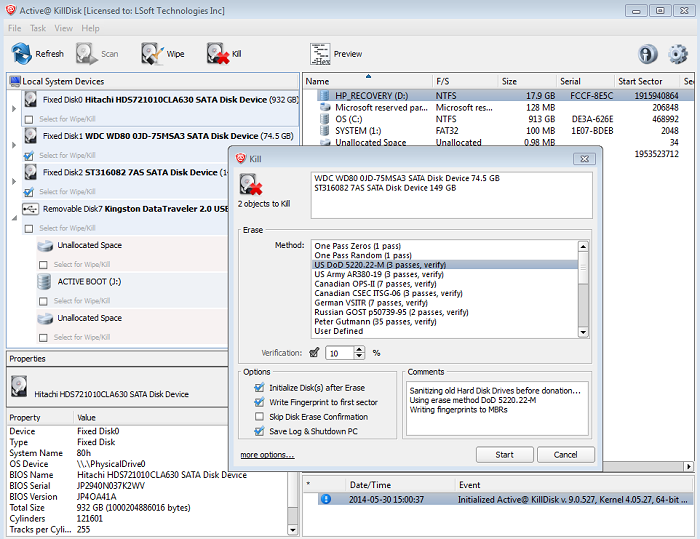
- Select an erase method from the list. Erase methods are described in Erase/Wipe Parameters in this guide.
- Set other parameters for erasing and add comments for the certificate, if needed. To specify log and certificate file location, e-mail notifications, and other settings, click the more options… link at the bottom. The settings box will then appear.
For information on these settings, see Chapter 6 in this guide.
- Click Start
- If the Skip Disk Erase Confirmation check box is clear, the Confirm Action dialog box appears.
Figure Confirm Action

- This is the final step before removing data from the selected drive forever. Type ERASE-ALL-DATA in the text box and press ENTER or click YES. The Progress bar appears below the disk on the left panel.
- Overall Wipe/Kill Progress is displayed on the right panel, as well as the detailed command status for the selected disk in the Local System Devices list.
- To stop the process at any time, click the Stop button
 for the particular disk. Click the Stop all button
  left to overall progress to cancel erasing for all disks. Note that data that has already been erased will not be recoverable.
Figure Disk Erasing is in Progress
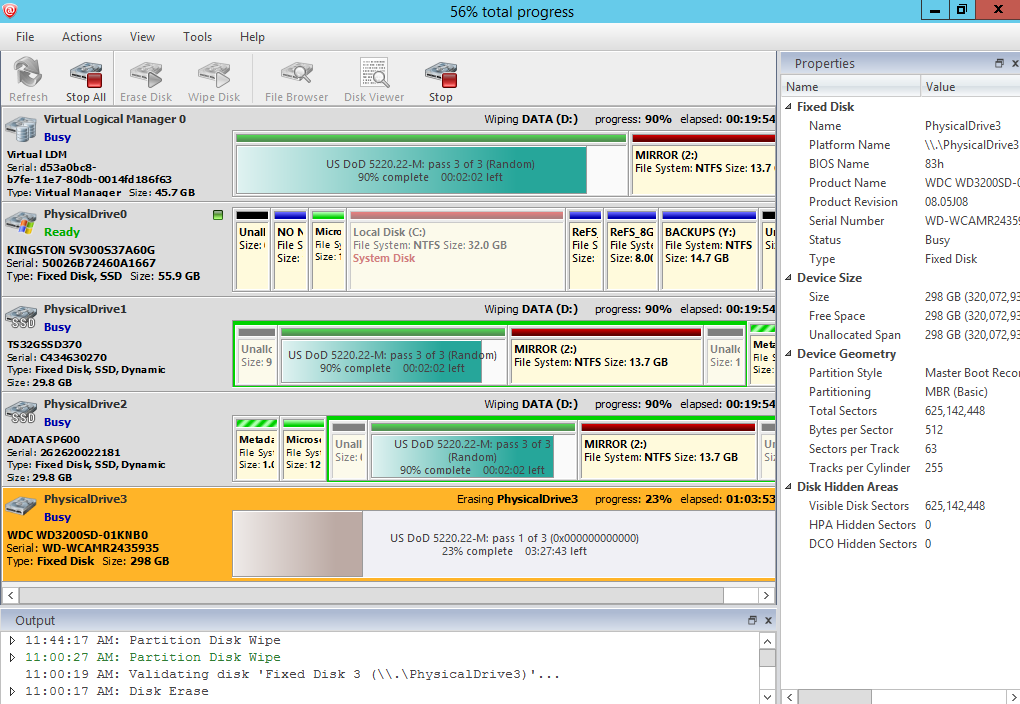
There is nothing more to do until the end of the disk erasing process. The application will operate on its own. However, you can still browse and inspect other disks, scan volumes and launch another Kill or Wipe processes for other objects. KillDisk perfectly erases disks in parallel!
If there are any errors, for example due to bad clusters, they will be reported on the Interactive screen and in the log. If such a message appears, you may cancel the operation (click Abort), or you may continue erasing data (click Ignore or Ignore All).
Because of the BIOS restrictions of some manufacturers, a hard disk device that is larger than 300 MB must have an MBR (Master Boot Record) in sector zero. If you erase sector zero and fill it with zeros or random characters, you might find that you cannot use the hard drive after erasing the data. It is for this reason KillDisk creates an empty partition table and writes a typical MBR in sector zero (in case the Initialize disk(s) after Erase option is selected).
Wipe Data from a Device
When you select a physical device such as Fixed Disk0, the wipe command processes all logical drives consecutively, deleting data in unoccupied areas. Unallocated space (where no partition exists) has been erased as well.
If KillDisk detects that a partition has been damaged or that it is not safe to proceed, KillDisk does not wipe data in that area. The reason it does not proceed is that a damaged partition might contain important data.
There are some cases where partitions on a device cannot be wiped. Some examples are an unknown or unsupported file system, a system volume, or an application start up drive. In these cases the Wipe button is disabled. If you select a device and the Wipe button is disabled, select individual partitions (drives) and wipe them separately.
If you want to erase data from the hard drive device permanently, see 3.2.1.1 Erase Data.
If you want to wipe data in unoccupied areas on selected logical drives, follow the steps in 3.2.3 Erase or Wipe Logical Drives (Partitions).
To wipe deleted data from a device:
- To choose a device to wipe, select the check box next to the device name. You may select multiple devices. In this case these disks will be wiped out simultaneously
- To wipe out all data in unoccupied sectors on the selected partitions, press F9 or click the Wipe toolbar button. The Wipe Free Disk Space dialog box appears.
Figure 3-7 Wipe Free Disk Space
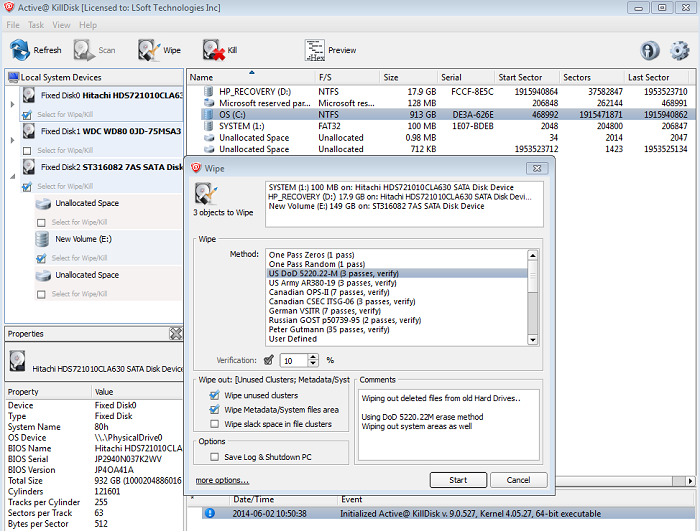
- To select a wipe type, choose a method from the Wipe Method list. Wipe methods are described in Chapter Erase/Wipe Parameters in this guide.
- You may change parameters in this dialog box, or click the more options… link at bottom to review and change other options. For information on these parameters, see Chapter Erase/Wipe Parameters in this guide.
- To advance to the final step before erasing data, click Start. If the Skip Confirmation check box is clear, the Confirm Action dialog box appears.
Figure 3-8 Confirm Action

- This is the final step before wiping data residue from unoccupied space on the selected drive.
To confirm the wipe action, click Yes. The progress of the wiping procedure will be monitored in the Disk Wiping screen.
- To stop the process for any reason, click the stop button for a particular disk. Click the stop all button left to the overall progress to cancel wiping for all selected disks. Note that all existing applications and data will not be touched. Data that has been wiped from unoccupied sectors is not recoverable.
- There is nothing more to do until the end of the disk wiping process. The application operates on its own.
If there are any errors, for example due to bad clusters, they will be reported on the Interactive screen and in the Log. If such a message appears, you may cancel the operation or continue wiping data.
- After the wiping process is completed select the wiped partition and press ENTER or double-click it to inspect the work that has been done. KillDisk scans the system records or the root records of the partition. The Folders and Files tab appears.
Existing file names and folder names appear with a multi-colored icon and deleted file names and folder names appear with a gray-colored icon. If the wiping process completed correctly, the data residue in these deleted file clusters and the place these files hold in the directory records or system records has been removed. You should not see any gray-colored file names or folder names in the wiped partition.

