Contents > Running Active@ KillDisk for Windows > Wipe Data from a Device
4.2.1 Interactive Mode (continued)
4.2.1.2 Wipe Data from a Device
When you select a physical device such as Fixed Disk 0, the wipe command processes all logical drives consecutively, deleting data in unoccupied areas.
Unallocated space (where no partition exists) has been erased as well. If KillDisk detects that a partition has been damaged or that it is not safe to proceed, KillDisk does not wipe data in that area. The reason it does not proceed is that a damaged partition might contain important data.
There are some cases where partitions on a device cannot be wiped. Some examples are an unknown or unsupported file system, a system volume or an application start up drive. In these cases, the Wipe button is disabled. If you select a device and the Wipe button is disabled, select individual partitions (drives) and wipe them separately.
If you want to erase data from the hard drive device permanently, see 4.2.1.1 Erase Data.
If you want to wipe data in unoccupied areas on selected logical drives, follow the steps in 4.2.3 Erase or Wipe Logical Drives (Partitions).
To wipe deleted data from a device:
- To choose a device to wipe, select the check box next to the device name. You may select multiple devices. In this case these disks will be wiped out simultaneously.
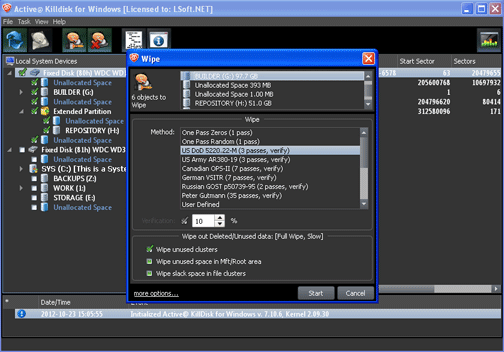
- To wipe out all data in unoccupied sectors on the selected partitions, press F9 or click the Wipe toolbar button. The Wipe Free Disk Space dialog box appears.
Wipe Free Disk Space

- To select a wipe type, choose a method from the Wipe Method list. Wipe methods are described in Chapter 5 Erase/Wipe Parameters in this guide.
- You may change parameters in this dialog box, or click the more options… link at bottom to review and change other options. For information on these parameters, seeErase/Wipe Parameters in this guide.
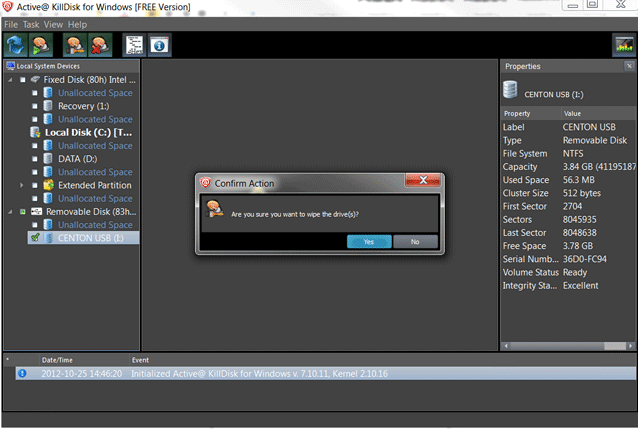
- To advance to the final step before erasing data, click Start. If the Skip Confirmation check box is clear, the Confirm Action dialog box appears.
Confirm Action

- This is the final step before wiping data residue from unoccupied space on the selected drive.
To confirm the wipe action, click Yes. The progress of the wiping procedure will be monitored in the Disk Wiping screen.
- To stop the process for any reason, click the Stop button for a particular disk, or click the Stop All button at the top left corner to cancel wiping for all selected disks. Note that all existing applications and data will not be touched. However, data that has been wiped from unoccupied sectors is not recoverable.
- There is nothing more to do until the end of the disk wiping process. The application operates on its own.
If there are any errors, for example due to bad clusters, they will be reported on the Interactive screen and in the Log. If such a message appears, you may cancel the operation, or continue wiping data.
- After the wiping process is completed, select the wiped partition and press ENTER or double-click it to inspect the work that has been done. KillDisk scans the system records or the root records of the partition. The Folders and Files tab appears.
Existing file names and folder names appear with a multi-colored icon and deleted file names and folder names appear with a gray-colored icon. If the wiping process completed correctly, the data residue in these deleted file clusters and the place these files hold in the directory records or system records has been removed. You should not see any gray-colored file names or folder names in the wiped partition.
|
This document is available in PDF format, which requires Adobe® Acrobat® Reader
(Free download):
|

