Active
KillDisk

Erasing Partitions

How to erase hard drive? Windows7 logo   How to erase hard drive? Intel logo

5.4 Erasing or Wiping Logical Drives (Partitions)

In all previous examples in this chapter, the process has erased data or wiped data from a physical drive. Using a similar method, you can erase or wipe logical disks and partitions, and even "Unallocated" areas where partitions used to exist and the area was damaged, or the area is not visible by the current operating system.

Erase Data From a Logical Drive

To erase data from a logical drive, open the DOS Interactive Mode screen and follow the steps below.
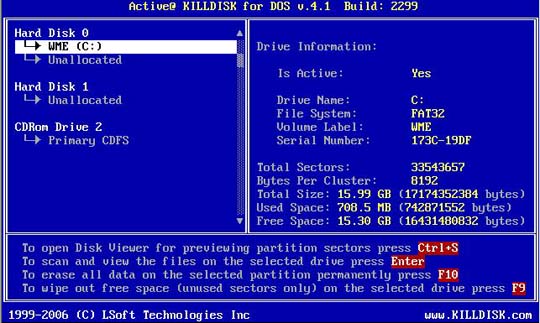
  1. The Detected Physical Devices screen appears as below:

    Detected Physical Devices

    Erase hard Drive. Detected Physical Devices

    All system hard drives and USB / floppy drives will be displayed in the left pane along with their system information in the right pane.
  2. Position the cursor over the logical disk or on the Unallocated area.
  3. Press [F10] to securely remove data. Follow directions to set up erase parameters.

Wipe Data From a Logical Drive

To wipe data from a logical drive, open the DOS Interactive Mode screen and follow the steps below.

  • The Detected Physical Devices screen appears.
    All system hard drives and USB / floppy drives will be displayed in the left pane along with their system information in the right pane.
  • Position the cursor over the logical drive.
  • Press [F9] to wipe data from unoccupied areas. Follow directions to set up wipe parameters.

5.5 Erase or Wipe Operation Complete

After operation is completed successfully, information on how drives have been erased or wiped is displayed. An example of an erase session is displayed below.

------------- Erase Session -----------------------
Active@ KillDisk started at: Thu Feb 20 11:56:51 2011
Target: Hard Disk 1
Erase method: US DoD 5220.22-M Passes:3
Verification:40% (completed successfully)
Time taken: 00:01:26
Total number of erased device(s), partition(s): 1

If the process encountered errors, for example from bad clusters, a summary of errors is presented in this report. Use the keyboard arrow keys to scroll through the report.

To save the log file, press [F2]. Details of this report are saved to a log file located in the USB / floppy from which you started Active@ KillDisk.

Before < Erasing or Wiping Logical Drives (Partitions) > Next

This document is available in PDF format,
which requires Adobe® Acrobat® Reader
(Free download):

USER'S GUIDE
Size: 714 KB

USER'S GUIDE (Console)
Size: 683 KB

KillDisk Datasheet
Size: 2,44 MB

Data Recovery

Data Utility

Data Security

Data Backup

CD/DVD Tools